Showing posts with label DIY. Show all posts

Sunday, April 19, 2015

It's a Good Day to be a Duck

It's been a wet day here, so I've spent the afternoon napping & scouring Pinterest for outdoor ideas.  My outdoor to do list is growing by leaps!   We are redoing the area by our front door.  It will still have some containers for plants but we've added a chair.  
It's a work in progress.  Initially, I was going to stain the chair, but have decided to paint it.  Paint will be easier to change up colors in the future.  I think we are going to do black & add a pillow for a pop of color.  I've been looking at outdoor pillows for a month or so.  I didn't want to spend a fortune though. I found this one while shopping at Aldi on Saturday. 
Score for 3.99 - thank you!!! 

My "to-do" seems to be growing rapidly - don't they always!  Our exterior really needs to be painted.  We don't have money budgeted to hire someone, so I'm on the fence about DIY.  We are one level & there are only a couple areas that are "high".   Regardless of whether we paint or not, the exterior definitely needs to be cleaned & I know we can tackle that ourselves.  

The azaleas finally bloomed this week.  I won't lie - they are not my favorite.  I think they are beautiful when in bloom, but honestly, don't last more than a couple of weeks.  I would love to re-do this area too. 

Do you have spring projects in the works? 

Sunday, February 8, 2015

Small Bathroom - Redesign on a Dime

I literally laugh out loud when searching for "small bathroom ideas" on Pinterest.   Some of the bathrooms are 3 times the size of our truly small bathroom.  About a year or so ago, I had the bright idea I would use paint leftover from the kitchen for the small bathroom.  This worked out beautifully until I ran out of paint & bought a quart to finish the project which didn't match up 100% - project FAIL!   I wish I could share a before picture, but it crashed with my phone - so just trust me on that one.  

Super husband's coworkers came over after the holidays for a post-Christmas celebration.  Apparently, I like working under pressure because I started the project on Tuesday & they were coming over on Saturday.  I found a gray & white chevron shower curtain awhile ago, so it was the inspiration for the room (& we love the gray in our master bath).  

Here it is in progress - I was already loving it at this point.  I wanted a new light fixture too, but it will have to wait.  
Sorry for the tilted picture (remember I keep it real on my blog),  the mirror was previously red, so I updated it with a 97 cent can of spray paint. 
The cabinet received a fresh coat of with paint.  The over the toilet shelving was a curbside find!  Shower curtain came from Kohls online.  Bath rug came from TJ Maxx - it was a two pack: one solid gray & one chevron. Paint color is Behr - Gentle Rain.  Overall, it looks so much better! 

I still want to: replace light fixture, add pops of Aqua for color; & fix ceiling (possibly headboard). 

Have you done any DIY lately?

Friday, September 26, 2014

What's been "pinned"?

I've talked about Pinterest many times on my blog - y'all (all 2 of my dedicated readers) are probably tired of hearing about it.  :)    However, it's my go-to for all sorts of things:  recipes, decorating ideas, healthy living inspiration, how-to!   While I have 1000s of pins,  I thought it would be great to start a board of Pins I've Completed!   I have a list a mile long of home projects to complete, but the next up will be our spare bathroom and found lots of design & inspiration ideas!

Do you ever try any of your pins?

PS - Remember when chevron was called zig-zag!  :)

Monday, September 2, 2013

A little elbow grease, a little time = clean oven!

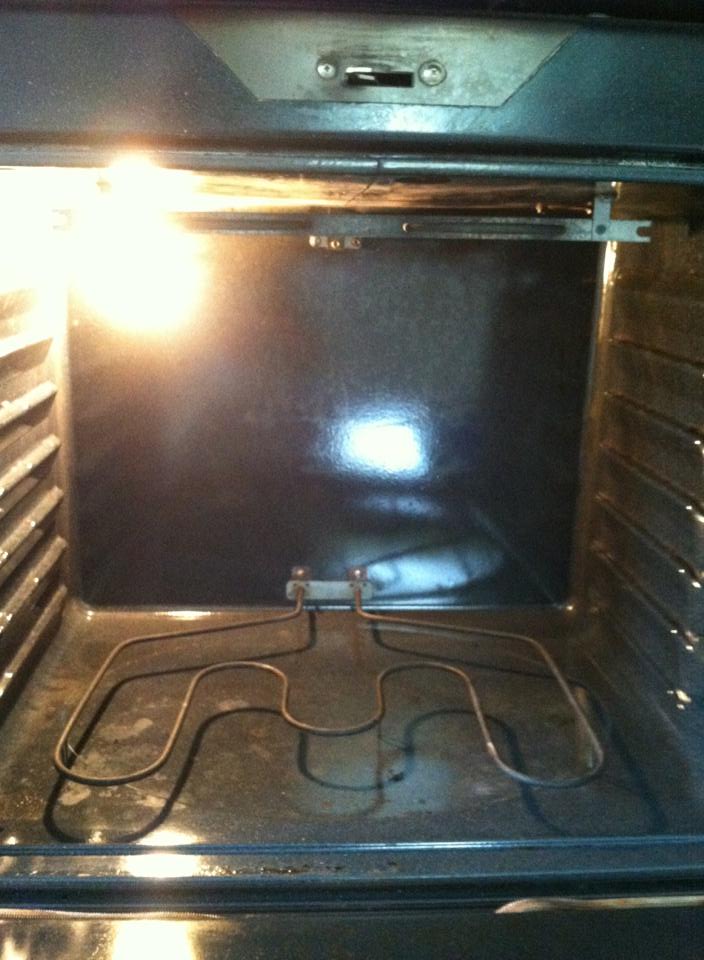
Yesterday,  I mentioned cleaning my oven as one of my "to-do's".   I'm happy to say I was able to check that off the list.   I've always said this blog was about keeping it real and the pictures of my oven will reassure you of that.   While I do have a self-cleaning oven,  I'd read reports and heard from a co-worker that this was not always the way to go.  It seems easy enough to hit "self clean" but the oven gets ridiculously hot as part of the process.  Since I wasn't trying to burn my house down, I opted for good ol' elbow grease.  Now, I will be completely honest and say the oven has not been cleaned in about 7-8 years. 

I promised I would keep it real - GASP!
How did I clean it?  Well, I'm glad you asked.  I know Easy-Off is a popular oven cleaner but I've also read the fumes can be intoxicating.  This was another "no-spend" project, so I used what I had on hand.

  • Hot Water
  • Shaklee Basic H Degeaser
  • Soap Pads (I had the Dollar General brand)
  • Hot Water
  • Rubber Gloves
  • Sponge
I started my laying an old sheet underneath the oven door to catch any crumbs or suds.  Then, I took a damp paper towel and wiped out all the loose crumbs.  Next,  I sprayed the Shaklee Degreaser liberally on the back and sides.  While it was soaking, I filled a bucket with hot water.  I got the sponge wet and then started wiping and scrubbing.  The sides/back of the oven were relatively easy to clean.  Next,  I sprayed down the bottom of the stove. Again, it was alot of elbow grease & repeated efforts of spray, scrub, and wipe. I had a couple of stubborn spots on the bottom, so I grabbed the soap pads I had on hand and went to work.  I repeated the same process for the oven door.    It's not perfect - but it looks soooo much better!

Super husband had to help with the oven door because I had used all my muscles on the oven itself! I am so happy with the results and so happy the products I had on hand worked.  It really didn't take me that long, so why did we let it get so bad?!! 

Are you relaxing or tackling projects this holiday weekend?


Sunday, September 1, 2013

Weekend Labor Day - Home Projects

Do you have a list of home projects or things you'd like "to-do"?    You know how I like lists.  :)     As I sit here this morning,  I'm slightly overwhelmed by my list because I don't know which project to start working on today.   But, it's quite possible that I could tackle more than one if I would quit thinking and just jump in!

On my list:

-Superson's bath room re-do (I had a revelation this week & realized that I could probably do this for ZERO dollars spent)

-Office closet (I need to declutter and reorganize the bottom half of the closet so we can start the transition to a mulitpurpose room)

-Clean my oven (undoubtedly the least exciting of all the other 2)

The optimist in me wants them all done today, so she can enjoy being lazy on her day off tomorrow.  :)

Do you have any weekend projects?

Thursday, August 29, 2013

Multipurpose Room -- Ugh Again?!

Way back in 2011,  I talked about our spare bedroom and the need for it to be a multipurpose room.   I'm happy to report it has not returned to the cluttered, chaotic state in one of the pictures of that post - but man, oh, man - my heart still doesn't swoon when I walk in.    I've decluttered and purged ALOT.    I don't want to share the current "before" pictures because I'm not sure when this project will unfold.    I've started an "inspiration" board here on Pinterest.   The room is still begging for direction and definition.  

Super-husband and I have agreed to keep the treadmill for 6 months & then re-evaluate.  Personally, I would rather be outdoors exercising (even if it is freezing cold) - he is the opposite & prefers the treadmill. 

The desk.  I have a love-hate relationship with it.  In the link to 2011, you'll see a corner desk.  I'm happy to report I disassembled that desk - it was not a "space saver" for us.  I'm currently evaluating the office closet idea.  I mentioned it as well in my first post & I really think that is the best option for the space.

Other than that,  I'd love to have a futon, bed, or seating area to accompany guest or for us to have a place to retreat.  The bottom line, I want it to be usable space for us & not a door that we keep closed.  This will likely be my Labor Day weekend project - my goals:  design on dime (not to spend much if any money)  & make the space fully functional. 

Please let me know if you have some suggestions!  :)

Monday, July 15, 2013

Design on a Dime - Master Bath Update

After last year's kitchen DIY,  I said it would be a long time before I tackled another project and after almost exactly a year -- I decided to dive in again!    Our master bath has been bugging me for awhile.  Most people wouldn't even considered it a master bath - it's probably the size of most homes half-baths.

We aren't certain, but we think the previous owners removed the shower/tub combo and replaced it with a shower stall.  I know brass was the "in" thing in the mid 80's but I wasn't digging it too much.  Aside from that, no matter how hard I tried - the caulk at the bottom was nearly impossible to keep clean as was the shower basin.  The whole project got started because super-son was heading to overnight camp for the first time and this momma needed something to keep her busy.


First step, remove all the caulk, clean with non-ammonia cleaner, followed by bleach... allow to dry really well and then recaulk.  Sounds relatively easy, but I'm not going to lie - most of the caulk came up relatively easy - but any residue on the wall was very hard to remove (sharp edge, goo-gone, you name it - I probably tried it).  We had lived with it looking less than stellar anyway - so I did the best I could and moved on.  Next, I patched the wall to the left of the shower stall - at some point there had been a small leak and fortunately, it wasn't ongoing and didn't cause significant damage.

Next up paint -- walls, ceiling, and trim.  It's been really hard to get good pictures of the room.  The before color was fairly neutral - beige with yellowish undertones - it went well with the brass if that's your thing.  :)   I wanted to go with Sherwin Williams Ice Cube - it was a very light grey - white with a hint of gray.  After painting a small area,  I realized I loved the color - but needed a little more grey.  Back to Sherwin Williams (always excellent customer service by the way) and they added to make it more like Olympus Gray.

Much better and it complements the gray tile floor.   I really didn't want the storage cabinets to come back in the bathroom, but this was "design on a dime" so there they are.   :)   The smaller one contains extra toiletries and the one over the toilet holds items we use on a daily basis.  Much improved overall - but the stall was still an eyesore to me.  I decided to get a tension rod and hang wall-to-wall to create the illusion that a regular tub/shower combo was behind there.  

Plan A:  We looked at Kohls,  Bed, Bath, and Beyond, Target and Walmart online and finally agreed on a shower curtain we both liked.   Only to realize, standard shower curtains are 72 inches in length - the shower stall was 74 inches itself -- back to square one.  Plan B:  I found out Bed, Bath, and Beyond online carries special size shower curtains and we agreed on one -- only to find out it was backordered and out of stock.  There wasn't alot to choose from - so plan C.   Find a high thread count sheet -- accent with grosgrain ribbon and have our embroidered with our monogram.   I stopped in at Home Goods to see what I could find - measurements in hand.  And stumbled across the perfect pattern for us - only it wasn't a shower curtain.  Plan D:  A lightweight twin XL duvet color was the perfect length and I loved the pattern! 

The  colors look amazing with the walls and floors -- since it is merely hiding our shower stall the fabric didn't matter!   I choose the round hooks with clips - so we didn't have to make any adjustments to the curtain in order to get it on the rod.  

The towel holder, toilet paper holder, hinges, and light fixture were all brass... but nothing that a little Krylon couldn't fix!   Worked perfectly on the hinges & light fixture.  We had a towel holder and toilet paper holder under the sink that previous owners had left (uhh 11 years ago). 


And a couple more pictures of the finished room - wish I could get a better picture!  We hung the tension rod at the ceiling and the room appears taller.


The only paint I had to purchase was 1 gallon from Sherwin Williams (yeah for 30% off) and the rest was leftover from last year's kitchen project.

In addition, I repaired a pesky drip from the shower head - thanks to Google, YouTube, and my pal, Sally.  :)


Saturday, March 9, 2013

Laundry Room - Design on a Dime

While searching Pinterest,  I've stumbled across so many amazing laundry rooms.   It makes me laugh to search for "small laundry room" and have pictures show up with laundry rooms ten times the size of my really, truly, small laundry room.   Anyway,  I created a board of inspiration for our laundry room and you can see it here. This is the mess I was working with (don't judge!) - this is real life  :)

Goodness, what a mess!  Our washer/dryer is located behind two bifold doors.  It's more like a laundry closet.  As you can see there is some attempt at storage, but it fails miserably.  My goals were to complete the project on a dime - spend as little money as possible;  group like items together in a more organized fashion; and give a little sense of style to the room.   My initial thoughts to 2 paint thick bold stripes in the area with leftover kitchen paint & find stylish storage  :)

I started by enlisting the help of my best friends, Sally and Angie.  Our idea of a great girls night out is helping each other with a project.  Angie's basement remodel is on our list, but she wasn't quite ready to tackle it.  We dove in head first - uh in some cases literally - for this project. 

We started by completely emptying the room and cleaning from floor to ceiling.  It's nearly impossible to see everything you are working with unless you do this step!  Purge items you don't need - it's much easier when you have help to discard items - you don't have time to think about "when" or "if" you will need an item in the future.   NEXT,  group like items together - I grouped in the following categories - cleaning, DIY, outdoors, lighting.

And after... you can see each crate has a chalkboard with the items within that crate.  I kept the blue cleaning caddy by itself  because it is used on a regular basis.  The black cube storage piece - we already had &  it contains all of our auto cleaning supplies.   The basket on top of the dryer contains items we use on a regular basis to complete laundry:  detergent, dryer sheets, stain remover, iron, etc.   Overall,  it looks so much better!!   As you can see, I did NOT paint the stripes I initially thought about. The crates came unfinished and Sally had some leftover stain from a project - we used it to give a splash of color to the area.  

The crates were on sale this week at our local AC Moore for under $8.00.  I have to admit I was pleasantly surprised by their size and durability.  I bought two and Sally gifted me two for my birthday.  The total cost for this project was under $20.00  I'm really pleased with how it turned out! 

We reorganized my pantry/small storage room too & I'll post it later!


Sunday, January 20, 2013

DIY Kitchen -- Curtains

Well, I am happy to report the sun is shining here again!   It was a very dreary week raining Monday - Thursday last week and then overnight on Thursday we got a light snowfall.   It is so nice to see the sun beaming through the windows!

Speaking of windows,  we are still trying to finish up the details of our kitchen.  Did I mention we started this project in July 2012?  :)   I hate to say Pinterest again, but so much of this project was inspired by pins.   Previously, we had no window treatments - just wood blinds.  I wanted to add something above the kitchen sink after finding this lovely fabric for a steal.

It's a Waverly print and I was fortunate to find it for $8.00 yard.  The background color is really close to our wall color - Sherwin Williams Tidewater.   Back to the window above the kitchen sink,  this window does not have wood blinds, but it looks directly onto our neighbor's carport.  Fortunately, we have great neighbors, but I wanted a little more privacy.  After pinning many options,  I decided to go with this one.  While it was posted as a no-sew project, my mom did end up sewing a pocket across the top for the rod.  (yes, people I can't sew - but it's on my "to learn" list).   Anyway,  I love, love, love how it turned out.
For the ribbon,  I simply looped it around and tied the bow!  Easy peasy!   The project was definitely under $16.00 because I had fabric leftover. Which made my wheels turn -- I was trying to think of ways to incorporate more of the fabric into the kitchen... and then - I thought more curtains :)   We have an eat-in kitchen, so the two large windows in the dining area have been left uncovered (with blinds of course but that's it) - I thought adding a window treatment would help set this area apart as a different "room" if you will.  I had looked for curtains to complement the fabric but they were outrageous - at least I thought so, remember this DIY was supposed to be on a dime  :)   Then, I found this idea on Pinterest.  Instead of painting stripes on the painter's cloth,  we took a strip of the floral fabric and then a strip of the ribbon to create the stripes.  I opted to put mine at the top (instead of the bottom as shown in the pin).  And, viola...
This was taken last night, so I apologize for the poor lighting - but I am in love!   Big thanks to my friend Sally for helping with this.  She did use the iron-on stitch witchery for the ribbon, but it didn't want to hold the fabric as well as it did the ribbon so she stitched it on for me. 

I forgot to mention - the rod.  I needed a rod that would extend to at least 94 inches - have your priced those lately?  Again - too expensive!  So, I headed back to Pinterest - surely I could find an idea.  I was not disappointed with this pin.  I headed to Home Depot with her list in hand and found everything I needed - the "rod" was electrical conduit.  I purchased a 10 foot piece for $2.00 (did you hear me TWO DOLLARS) and super-husband cut it down to size.  

I'm embarrassed to say the most expensive part of this project were the rings to hold the curtain.  I could not come up with a cheaper alternative or maybe I didn't search hard enough.  :)   I bought 4 packs of 10 and placed them every 4 inches on the curtains.  The drop-cloths are probably a little heavier than curtains and I wanted to make sure they were going to stay up.  I ended up using 3.5 packs and they were around $8.00 a pack I think. 

Overall, all the whole project was very reasonably priced! I'm still debating on whether or not I want to add a rug underneath the dining table.  It would add a little more color and again, help set this area apart from the rest of the kitchen.  Stay tuned!


Tuesday, January 1, 2013

Valentine Wreath -- Cupcake Style

I'm still trying to figure out the direction of the blog, so for now things may seem "out of order".  :)

Yesterday,  I was feeling crafty.  I searched Pinterest for some inspiration.  If you aren't on Pinterest, you have no idea what you are missing.  It can be a time-suck - but I've also found lots of tips, inspiration, and motivation from the site too.  I came across this awesome cupcake wreath tutorial.

Items needed:  cupcake wrappers;  wreath form;  straight pins

You simply take the cupcake liners & fold, twist, scrunch (whatever suits your fancy) and pin into the wreath form.   And then you have this ---

I plan on adding a few more for fullness.   This was a relatively inexpensive project.  I found the cupcake liners in the Christmas clearance at Michaels for 79 cents for a pack of 75 and I didn't use the entire pack.  The wreath form was 6.99 minus a 40% off coupon.   Other than the colors (red/white) - the print is not really "Christmas-y", so make sure you think outside the box when looking for after Christmas deals!

Linking up to a Bowl Full of Lemons!


Saturday, November 24, 2012

Kitchen Update - Part 2

A couple of weeks ago,  I posted about the pleasures of removing our popcorn ceiling.  I can't tell you how relieved I was to cross that off my list.  The project was painting, painting, and more painting -- walls & cabinets.

The walls had been the same color (a nice, neutral beige) since we moved into the house in 2002.  I'm not going to lie - I liked it and had intentions of repeating with the same color.

But everyone kept saying - if you are going to paint, WHY paint it the same color?   I'll tell you why - I tend to play it safe that's why!   Well, the more I thought about it - the crazier I realized I was - we needed to step out of the box and try something different.   Replacing countertops was not in our budget, so we decided to go with a color that worked with the hideous color (dark blue-green) instead of working against it.  We chose Sherwin Williams -Tidewater.  Oh my stars - I LOVE IT!
The picture is a little darker than the actual walls.


It brightens up the space!  I wasn't completely convinced at first - it reminded me of a baby's nursery.  However, once we got the kitchen "put back together" - I loved it.  Our furniture is warm oak with honey tones and it complements the paint color.  The pictures I've posted are in the eat-in area of the kitchen. 

Here's one more picture and a sneak peek at one my favorite (and functional) accessories so far!
This picture is more true to color.

More to come...

Sunday, November 11, 2012

Kitchen Update on a Dime - Part 1: The Ceiling.. uh Popcorn

Well, it's obviously been awhile since I've posted.   After graduation, I got incredibly lazy and just enjoyed doing absolutely nothing.  For three years, I burned the candle at both ends - working full-time, going to school full-time, trying to maintain a home, be a good wife and mother - needless to say I crashed and burned.  :)

Alas, it didn't last too long.  I started on my kitchen.  For a couple of years, I've been wanting to do some updates (click here for previous post!).  However, updates cost money - cha-ching!   My main issue was the popcorn ceiling - it had started to crack in several places, so I thought it would come down easy peasy.   Handy Randy (our neighbor) advised me to be very careful because any knicks into the sheetrock would have to be repaired.  To err on the side of caution, I decided to use a plastic putty knife to get things started.

Well at the end of day 1 (I should note I worked on this after work, so you won't think I'm a complete loser), it looked like this...

Lessons learned from Day 1:
  • Plastic, plastic and more plastic - it needs to cover EVERYTHING.  This is a dusty job.
  • Time - I need more of it because this is going to take FOREVER.
  • Music - Tunes need to be rocking or you'll lose your mind!
  • Hubby - Did I mention I got the bright idea to do this when he was unable to help?!  He had a medical procedure and was unable to lift his arm above shoulder height or lift anything heavy for 6 weeks!
Onward to Day 3 - let's keep scraping, scraping, and scraping and it's finally done!
Lessons learned from Day 2:
  • Metal putty knife is necessary!  Some friends stopped by to help.  They had metal putty knives - I cringed but I'm certainly not going to turn down help b/c at this rate it is going to take FOREVER!  Their first scrape and it unzips off the ceiling like a zipper.  REALLY!!   I grabbed my metal putty knife and we had the ceiling down by the end of the night.  
  • Friends - I needed them.  This was my first DIY major project and it didn't take me long to realize I bit off more than I can chew.  Thankful for their words of encouragement!
  • Water is not necessary at least not for me! I had read to spray a small section and scrape, but once I switched over to the metal putty knife it came down so easy.
Day 4 - sanding, putty, sanding, putty... sanding, sanding, sanding.  I feel like I went over the ceiling a thousand times.  I wanted it to be perfect.
Day 5 or 6 and I'm losing my mind -- I want my kitchen back.  I'm tired of the plastic, dust. My family is tired of sandwiches.  Haha!
Again, I'm not sure what day we are on maybe 7 or 8 at this point.  It's finally primed.  I used Sherwin Williams products and couldn't be more pleased, and no, I wasn't paid to say that.  The staff at my local store were incredibly knowledgeable, helpful, and patient with me.  My memory is failing me now, but I think we did 2 coats of primer and 2 coats of paint.  We went with a flat white.  I love the clean look of white.

Here it is finally DONE!  It's not perfect - if you really look, you can tell I should have sanded more.  However my theory is - if someone notices the imperfections and it bothers them - then they don't need to be in my house!   It was a definite labor of love.   Will I tackle other rooms?   Hahaha!!!   I would like to think future rooms might be a bit smoother in the process as this was complete trial and error, but NO I don't intend to do any other rooms in the near future. 

I'll post more later this week on the cabinets, wall color and other updates!